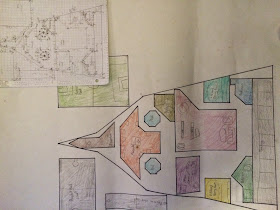
Every year I look forward to our geometry units for several reasons. Not only is it one of my favorite subjects to teach, I also get to introduce our Blueprint Project to the sixth graders! After seeing (and somehow remembering!) the previous year's blueprints out in the hallway, the current sixth graders have been asking throughout the year, "When are we going to do those blueprint projects?" Now that we have wrapped up the entire project, I wanted to take some time to write about the projects from start to finish! The link below is a free copy of the packet I give to students at the beginning of the project. Although this is free, you will also need some additional materials for each student (poster board, graph paper, colored pencils, Sharpies, etc.).
Blueprint Project
The first step of the Blueprint Project is for students to create a building of their choice on a piece of graphs paper. Often times, this is their favorite part! They love the open-ended nature of being able to design any type of building, with anything in it. Lots of students design dream houses, but I always look forward to seeing the creativity of the students when picking the type of building. I have seen everything from animal rescue centers to aquariums! On their graph paper blueprints, they must have all angles/wall lengths measured and labeled. In addition, I require the students to double each of their lengths and write this in parenthesis. This is very helpful later on when they are enlarging their blueprints! Here is a picture of one of my students designing their blueprint.
Once their graph paper blueprint is drawn and labeled, each student gets a large piece of poster board. On the poster board, they must enlarge their original blueprint to twice the size. I have used other scale factors before but have found that having everyone multiply by two ensures that it will fit on the poster board! It is extremely important to stress accuracy when measuring and drawing the angles and lengths. If the students aren't accurate, then they will have wall lengths or angles that don't line up on their final blueprint! Here are a few pictures of my students working on their final blueprints. I am always amazed at the detail some of my students include on their projects!
Finally, the last stage of the blueprints...adding colors and detail! Once all of their walls are drawn in pencil, the students can begin to add details, outline their walls with Sharpies, and use colored pencil to add some color. All of the details do not need to be measured (couches, tables, chairs, etc.). Here are some of the creative designs my students came up with this year! Some of my students really spent a lot of time outside of class making their projects look great!
As always, I'd love to hear any questions you might have about the projects! If you are thinking of trying out the project with your students, let me know and I'd be happy to provide some useful tips when introducing the Blueprint Project for the first time. Have a great week everyone!


This sounds like a great project! I would love some tips on introducing it.
ReplyDelete